Posts

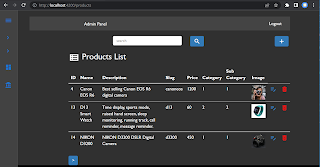
Angular Upload Form Data & Files

Image
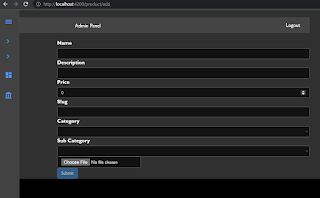
In the previous tutorial, you learnt to create UI to display products list and do pagination . To finish the Angular tutorials to build a simple admin panel, we add functionalities to add products with image files, update and delete existing products from MYSQL database. Execute the following command to create ProductUpload component.  ang14-client>ng generate component ProductUpload product-upload/product-upload.component.ts import { Component, OnInit } from '@angular/core' ; import { ProductService } from '../services/product.service' ; import { AuthService } from '../services/auth.service' ; import { HttpClient } from '@angular/common/http' ; import { ActivatedRoute, Router } from '@angular/router' ; @ Component({ selector : 'app-productupload' , templateUrl : './product-upload.component.html' , styleUrls : [ './product-upload.component.css' ] }) export class ProductUploadComponent implements OnIni

Angular with PHP & MYSQL to display products list & paging

Image
In the third part of Angular tutorials, you learn to create Angular component and service to display products list from API endpoints, filter products by name and do pagination. Execute command below to create produce service in services folder. The product service is used to count products with search text and retrieve product list with search text and  a range of specified start and limit parameters from API endpoints. The APIs requires a token to authenticate. So, you need to add the token to the request headers. ang14-client>ng generate service services/product services/product.service.ts import { Injectable } from '@angular/core' ; import { HttpClient} from '@angular/common/http' ; import { Observable } from 'rxjs' ; import { map, catchError } from 'rxjs/operators' ; import { HttpHeaders } from '@angular/common/http' ; import { AuthService } from '../services/auth.service' ; import {api_url_root} from "../app.constant

Angular Login & Register with PHP & MYSQL

Image
This is the second part of Angular tutorials. In the first part, you learnt to create Angular app and add a side bar menu . In the second part, you learn to create register and login forms and access PHP APIs using Angular services.  Execute the following commands to generate register and login components. ang14-client>ng generate component register ang14-client>ng generate component login The register and components are created in register and login folders. In Angular, a component relies on a service to work with  APIs to access data from a database. Let execute the command below to generate auth service in services folder. ang14-client>ng generate service services/auth register/register.component.ts import { Component, OnInit } from '@angular/core' ; import { AuthService } from '../services/auth.service' ; import { Router } from '@angular/router' ; import { HttpClient } from '@angular/common/http' ; @ Component({ selector : 'app-